Market Creation
1. Navigate to the Markets screen
-
Log in to Ops-Admin.
-
In the left navigation, click Markets (under the main Plans/Communications header).

-
You’ll land on the Markets list with a Search Filters bar at the top and an Add New Market button on the right.
2. Start a new Market
-
On the Markets page, click ➕ Add New Market (top-right of the Markets panel).

-
You’ll be taken to the Edit Market screen with several tabs on the left:
- Basic Configuration
- Advanced Configuration
- Autoresponder’s Actions
- Associated Documents
You will start on Basic Configuration.
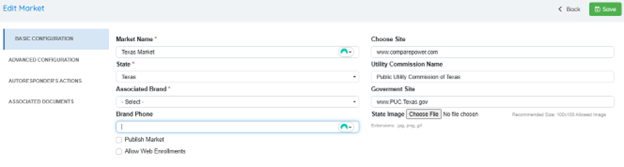
3. Complete the Basic Configuration tab
On the Basic Configuration tab, fill out the required fields (marked with a *) and any optional ones:
Left side
-
Market Name *
- Enter a clear, descriptive name (e.g., “Texas Market”).
-
State *
- Choose the state from the dropdown (e.g., “Texas”).
-
Associated Brand *
- Select the brand this market belongs to from the dropdown.
-
Brand Phone
- Enter the primary phone number that should be shown/used for this market.
-
Publish Market (checkbox)
-
Check this if you want the market to be live/visible immediately.
-
Leave unchecked if you’re still configuring and want to keep it as a draft.
-
-
Allow Web Enrollments (checkbox)
- Check if customers should be able to enroll via the web for this market.
Right side
-
Choose Site
- Select the website/domain the market is tied to (e.g.,
www.comparepower.com).
- Select the website/domain the market is tied to (e.g.,
-
Utility Commission Name
- Enter the full utility commission name (e.g., “Public Utility Commission of Texas”).
-
Government Site
- Enter the government/commission website URL (e.g.,
www.PUC.Texas.gov).
- Enter the government/commission website URL (e.g.,
-
State Image
-
(Optional but recommended) Upload a small state image/logo.
-
Click Choose File, select an image (jpg/png/gif); the recommended size is shown near the field (e.g., 100×100).
-
-
Click Save (top-right) once Basic Configuration is complete.
4. Configure Advanced settings (Advanced Configuration tab)
Click Advanced Configuration on the left to open the operational and wizard options.
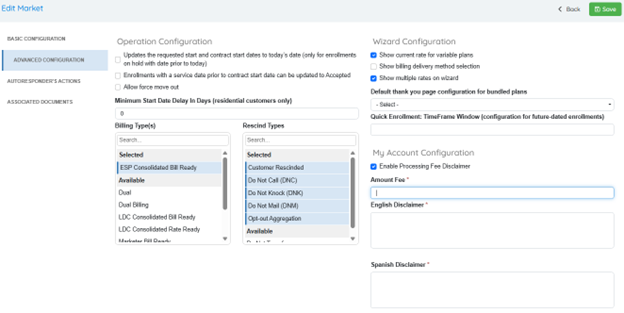
4.1 Operation Configuration
-
Review and set the operation checkboxes:
-
Updates the requested start and contract start dates to today’s date. (Used for enrollments on hold with past dates.)
-
Enrollments with a service date prior to contract start date can be updated to Accepted.
-
Allow force move out (if your operations allow this action).
-
-
Minimum Start Date Delay in Days (residential customers only)
- Enter the minimum days between enrollment and start date (e.g.,
0if no delay).
- Enter the minimum days between enrollment and start date (e.g.,
-
Billing Type(s)
-
Use the left list box to select applicable billing types for this market (e.g., “ESP Consolidated Bill Ready”, “Dual Billing”, etc.).
-
Use the search bar in the list to quickly find billing types and ensure the correct ones appear in the Selected area.
-
-
Rescind Types
-
Use the right list box to select rescind/cancellation reasons that apply to this market (e.g., “Customer Rescinded”, “Do Not Call (DNC)”, “Do Not Knock (DNK)”, “Do Not Mail (DNM)”, “Opt-out Aggregation”, etc.).
-
Again, use the search bar to find and select the correct values.
-
4.2 Wizard Configuration
On the right side of the same tab:
-
Configure Wizard Configuration options:
-
Show current rate for variable plans (checkbox).
-
Show billing delivery method selection (checkbox).
-
Show multiple rates on wizard (checkbox).
-
-
Default thank you page configuration for bundled plans
- Choose the default “thank you” page configuration from the dropdown.
-
Quick Enrollment: Time Frame Window (configuration for future-dated enrollments)
- Specify or select the timeframe window used when quick enrollment is enabled for future start dates.
4.3 My Account Configuration
Still on the right side under My Account Configuration:
-
Optional: Enable Processing Fee Disclaimer (checkbox).
- Check if you want to show a processing fee disclaimer in My Account.
-
Amount Fee *
- If the disclaimer is enabled, enter the fee amount (required).
-
English Disclaimer *
- Enter the English disclaimer text that should display in My Account.
-
Spanish Disclaimer *
- Enter the Spanish version of the disclaimer text, if required for your market.
-
Click Save (top-right) when done with this tab.
5. Configure autoresponder actions (Autoresponder’s Actions tab)
-
Click Autoresponder’s Actions on the left.

-
In the section labeled Market autoresponders that require letters, use the search box to locate the relevant autoresponders that will send out letters for this market.
-
Add/select the appropriate autoresponders according to your internal rules (e.g., welcome letters, rescind notices, renewal notices).
-
Click Save again.
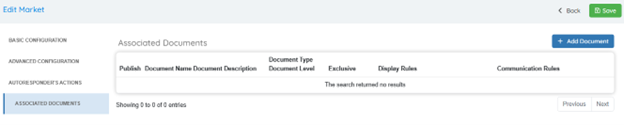
6. Attach documents (Associated Documents tab)
-
Click Associated Documents on the left.
-
On the Associated Documents grid:
-
Click ➕ Add Document (top-right of the grid).
-
For each document you add, you’ll be able to define:
-
Publish (whether the document is active)
-
Document Name
-
Document Description
-
Document Type
-
Document Level
-
Exclusive flag
-
Display Rules
-
Communication Rules
-
-
-
(The grid headers in your PDF show these columns, even though the sample has “0 of 0 entries.”)
-
Add as many documents as needed (e.g., Terms of Service, EFLs, YRAC, welcome packets).
-
Save your changes again with Save.
7. Final check & publishing
-
Confirm all required fields (*) across all tabs are filled in:
-
Basic Configuration (Market Name, State, Associated Brand, etc.)
-
Advanced Configuration (Amount Fee, disclaimers, etc., where required)
-
-
Ensure Publish Market is checked in Basic Configuration if you’re ready for the market to be live.
-
Click Save one last time.
Once saved with Publish Market enabled, your new Market should appear in the Markets list and be available for use in plans, enrollments, and related workflows in Ops-Admin.